Jordan Loewenstein, D.C. | La Jolla Chiropractor
SI Joint Pain:
Is That What This Is?
It is a real cause of low back pain and it is also over-diagnosed, which makes the first question the important one. Here is how to work out whether the joint where your spine meets your pelvis is genuinely the problem, what actually helps it, and the one pattern that means it is something else entirely.
What The SI Joint
Actually Does
You have two of them, one either side, where the base of your spine meets your pelvis. They barely move by design — a couple of millimetres of give — and their job is to hand the weight of your upper body across into your legs. When one gets irritated, the pain sits low, off to one side, and you can usually point to it.
Find it on yourself. Put your hands on the top of your hip bones, thumbs pointing back. Slide the thumbs down and in a couple of inches until you hit two firm bumps either side of the base of your spine. That is roughly it — below the level of your belt line, lower than most people expect back pain to live.
One side, not both. Almost always. If it is symmetrical across the whole low back, this is usually not the SI joint.
Low and deep, and you can find it with one finger. When someone points to a spot the size of a coin just inside the top of the pelvis, that is a meaningful clue — more meaningful than most of what gets said about this joint. Not proof on its own, but it is where the conversation starts.
It hates transitions more than positions. Rolling over in bed. Getting out of a car. Standing up after a long sit. Putting on trousers standing up. Going up stairs one leg at a time.
It often refers down the leg. Roughly half of people with a confirmed SI joint problem feel it in the buttock and back of the thigh, about a quarter feel it below the knee, and a smaller group feel it into the foot. So a “sciatica pattern” does not rule this out.
How common is it? When researchers confirm it properly — numbing the joint under imaging and seeing whether the pain goes — it accounts for somewhere between 15% and 30% of ongoing low back pain.
That is common enough to take seriously and nowhere near common enough to be the default explanation for every sore back. Which is exactly why the next section exists.
Is It Really
Your SI Joint?
There is a proper way to test this, and it is not feeling around for a joint that is stuck. Five specific tests load the joint from different directions. If three of them reproduce your familiar pain, the SI joint moves right up the list. If none of them do, it comes off the list almost entirely — which is arguably the most useful thing the whole examination does.
Distraction. On your back, pressure down and out through the front of both hip bones, pulling the joint open at the back.
Thigh thrust. Hip bent to ninety degrees, pressure straight down the line of the thigh, driving the joint backwards.
Compression. Side-lying, pressure straight down through the upper hip bone, squeezing the joint.
Sacral thrust. Face down, pressure through the middle of the sacrum.
Gaenslen’s. One leg pulled to the chest while the other hangs off the edge of the table, twisting the two sides of the pelvis in opposite directions.
All five are looking for one thing: your pain. Not any pain — the exact discomfort that brought you in. A test that hurts in a way you have never felt before does not count.
Why a cluster and not one test? Because no single one of these is good enough on its own. Any of them can provoke something in a person who does not have an SI problem at all. Run together, three or more positives is a genuine signal.
Being straight about what that gets you: a positive cluster raises the probability, it does not settle it. The only definitive answer is numbing the joint under imaging and seeing whether the pain disappears, which is a step almost nobody needs to take. A negative cluster, on the other hand, is close to conclusive in the other direction.
You will hear that a lot, and it is worth understanding what it does and does not mean. Looking at how the pelvis is sitting — one side riding higher, a bit of rotation — is a normal part of an examination and worth noting. It is a starting point.
What it is not is the finding that makes the diagnosis. Two examiners looking at the same pelvis often describe it differently, and small asymmetries turn up in plenty of people with no pain at all. The provocation tests are what do the work, and any decent plan should be built on those.
The Pattern That Means Something Else
This is the one genuinely important thing on the page. Read the list.
There is a form of back and buttock pain that comes from inflammation rather than mechanics, and the SI joints are usually where it starts. It gets treated as a stubborn mechanical problem for years before anyone spots it, and it is completely different to manage.
- It started before you turned forty-five, and came on gradually rather than after an incident
- It has been going on more than three months
- Morning stiffness lasting more than half an hour — not a couple of stiff minutes, a genuine slow start
- Movement makes it better, rest makes it worse. This is the reverse of most mechanical back pain and it is the strongest single clue
- It wakes you in the second half of the night, and you get up and move around to settle it
- The buttock pain alternates sides over weeks or months
- Anti-inflammatories work unusually well
Four or more of those together is worth blood work and an MRI, which is one of the few situations where a scan of this area genuinely earns its place. MRI picks up inflammation in these joints reliably, and it changes what happens next.
Otherwise, imaging does not diagnose a mechanical SI problem. An X-ray of the pelvis cannot tell you whether this joint is the source of your pain — it is there to rule out fracture and structural disease, not to confirm the diagnosis.
Where Chiropractic
Helps
The combination is what works: hands-on treatment to settle the joint down, then hip and trunk strengthening so it stops getting overloaded in the first place. Treatment buys you the window. The program is what keeps it.
The strongest evidence in this area is for targeted hip and trunk strengthening. A pooled analysis of seven trials covering 1,051 people with pain from this region found that motor control and strengthening work reduced both pain and disability.
Trials of hands-on treatment for the SI joint are smaller, and they point the same direction. When manipulation has been compared against exercise for this problem, both groups improve — with the hands-on side tending to get people comfortable sooner.
Which is the honest and quite practical conclusion: the treatment brings the pain down faster, the strengthening is what stops it coming back. Doing one without the other is why this problem has a reputation for recurring.
What happens in the room. First the five provocation tests, because everything after that depends on whether this joint is actually the problem. Then range of motion through the low back and hips, orthopaedic testing to sort out what else is involved, and a look at how the pelvis is sitting with you face down.
If it is the SI joint, treatment is aimed at that joint and at what is loading it. The muscles around it are almost always part of the story — the deep hip rotators, the glutes, and the band of tissue running from the low back into the buttock, all of which tighten protectively around an irritated joint and then keep it irritated. Those get worked by hand.
Settle It,
Then Support It
This joint does not need to be loosened. It needs the muscles around it to do their job so it stops taking load it was never meant to take. Tier 1 takes the pull off it. Tier 2 wakes up the hip muscles that should be sharing the work. Tier 3 loads one leg at a time, which is where the real change happens. Do more on the painful side.
Tier 1 — Take The Pull Off It
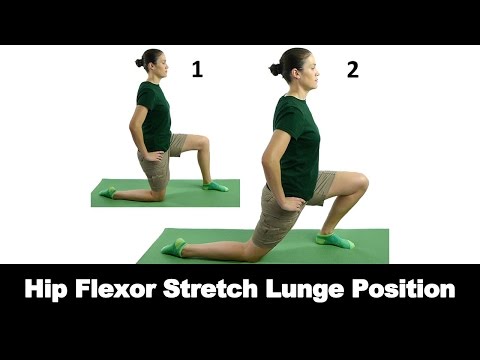
Daily, five minutes. Nothing here should sharpen the pain. A stretch that reproduces the exact ache you came for is a stretch to skip for now.
 Watch demo
 Watch demo
 Watch demo
 Watch demo
Tier 2 — Wake Up The Hips
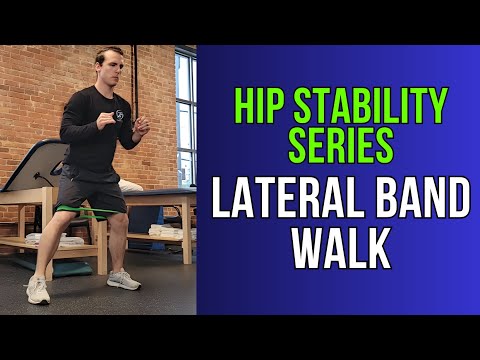
Daily. This is the tier that actually changes the SI joint, because these are the muscles that should be absorbing load before it reaches it.
 Watch demo
 Watch demo
 Watch demo
 Watch demo
 Watch demo
Tier 3 — One Leg At A Time
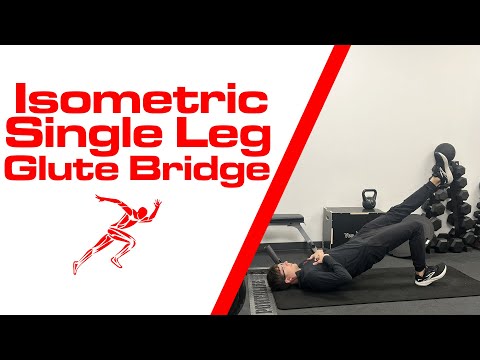
Three times a week, once Tier 2 is comfortable. Every irritating movement on this page happens on one leg — stairs, getting out of a car, standing up. This is where that gets trained.
 Watch demo
 Watch demo
 Watch demo
 Watch demo
Do This,
Not That
SI Joint
Questions
The strongest everyday clue is that you can point to it with one finger, low down and just inside the top of your hip bone, on one side only. It typically hates transitions — rolling over in bed, getting out of a car, standing up after a long sit — more than it hates any particular position.
Confirming it takes a set of five provocation tests. Three or more reproducing your familiar pain makes it likely. If none of them do, it is almost certainly something else.
Not for the ordinary mechanical version. Imaging of this area is there to rule out fracture, infection and structural disease, not to confirm that this joint is the source of your pain.
There is one important exception. If the pattern looks inflammatory — onset before forty-five, morning stiffness over half an hour, better with movement than rest, waking in the second half of the night — MRI picks that up reliably and it changes everything about the plan.
Yes, and the useful way to think about it is as two halves. Hands-on treatment settles the joint and the muscles guarding around it, which is what brings the pain down. Targeted hip and trunk strengthening is what stops it recurring.
A pooled analysis of seven trials covering 1,051 people supports the strengthening side. Trials of manual treatment for this joint are smaller and point the same way, with the hands-on group tending to get comfortable sooner. Doing one without the other is why this problem has a reputation for coming back.
It is a common phrase and it overstates what is happening. These joints move a couple of millimetres by design, and they are held by some of the strongest ligaments in the body. They do not slip out and get put back.
What does happen is that the joint becomes irritated and stops moving through its small normal range, with the muscles around it clamping down. Treatment restores that movement. It is a change in how the joint moves, not in where it sits.
Because this joint is loaded by transitions rather than positions. Splitting the legs to step out of a car twists the two halves of the pelvis in opposite directions, which is very close to one of the tests used to provoke it deliberately.
Swinging both knees out together as one unit removes most of that, and it is the single most effective change most people make.
It helps some people and it is safe to try. Worn low, across the hip bones rather than around the waist, it can take enough edge off a bad patch to let you move normally and get on with the strengthening.
What the evidence does not show is that a belt changes the underlying problem. Treat it as a support while you build, not as the treatment.
Most people notice a real difference within one to two weeks of proper treatment, which is faster than this problem has a reputation for. Getting it to stay settled is the longer job, and that is the strengthening.
Give the program six to eight weeks before you judge it. The Tier 3 single-leg work is the part that decides whether you are still dealing with this next year.
Related but its own thing. Pelvic girdle pain in and after pregnancy comes from a combination of ligament laxity and a genuinely different load through the pelvis, and it usually settles over the first year.
The management overlaps heavily with what is on this page — hip and trunk strengthening, avoiding one-legged loading in the bad patches, and a belt if it helps. It is worth being assessed rather than waiting it out, because the strengthening works better started early.
Find Out If It Is
Actually This Joint
Five tests take about five minutes and they tell you whether this is the SI joint or something wearing its costume. If it is, treatment settles it down and the program above keeps it settled. Evening and Sunday appointments available.